I've been taking on more and more print jobs with the addition of my Lulzbot Taz 5. As a result I decided to try to add a page dedicated to providing information about what 3D printing services i offer and to try to address any questions someone may have. Click here to check it out!
Busy 3D Printing Weekend
This weekend turned out to be all about 3D printing. Along the way I've learned a few things which is always good.
The first thing I learned was to disregard the Lulzbot instructions on how to level the print bed. They instruct you to use a sheet of paper folded in half (two sheet thicknesses) to set the print head which gets close but paper is compliant so its not very consistent. I decided to ditch the paper and got my feeler gauges out. The paper measured out at .007" in thickness so that's the gauge I used. Worked brilliantly!
The second thing I learned was to just ditch the 1.75mm filament and go for 3mm. I have a large stock of 1.75 from my Printrbot and it can work in the Lulzbot but it seems to jam easily since its not constrained very well in the extruder. I may be able to run one print just fine only to have the extruder jam shortly after starting the next print. I also have reluctantly decided that my old reliable Printrbot might be best sold to make way for the new filament standard and higher print quality of the Lulzbot. As much as I would like to keep it for doing print jobs simultaneously I honestly just prefer the Lulzbot. There's no worrying about if a print will fit, no painters tape to lay down or peel off once a print is done. In fact with the Lulzbot I have to make sure to print in different parts of the bed so the special coating wears evenly (or so they suggest).
Most of this weekend was spent working on printing key chains for Palatov. They were impressed with the quality of the Corsa Research & Development key chains I printed and helped to revise the key chain design to make it more practical. They also expressed interest in a new shift knob that was plastic and larger so it didn't conduct as much heat into the drivers hand and wanted to see about doing custom printed key lanyards (the plastic part of the key). I'm pleased to say I've been able to work some magic and come up with some nice examples to show off on Monday. I also had a bit of fun printing a new custom badge for my Lulzbot, it looks much better with the Corsa Research and Development logo but I think the file could use a bit of tweaking so the letters print out clearer. A project for the future I think.


Less than a week in and I'm already making modifications!
I've had my Lulzbot Taz 5 for less than a week and already I've found a need to make modifications. Click on the image below to find out more.

3D Printing Upgrade

Last year I jumped into 3D printing not knowing where it would take me. I had my doubts that I would ever do anything useful with a printer and figured it would just be an expensive toy. One year on and I find my printer to be an indispensable tool used for everything from 'reality checking' designs for Palatov Motorsports to inventing new things and developing solutions for all those times when I think "I really wish I had something that did this.." My little Printrbot has been such a great tool that I decided in 2016 to significantly upgrade my printing capabilities with a Lulzbo Taz 5. As you can see from this picture, the Taz 5 is a serious machine dwarfing my Printrbot. Make magazine recently deemed this printer the best in a collection of excellent machines but to be fair my Printrbot in the same comparison came pretty close to earning a similar score. Will it live up to the hype? I'll soon find out!
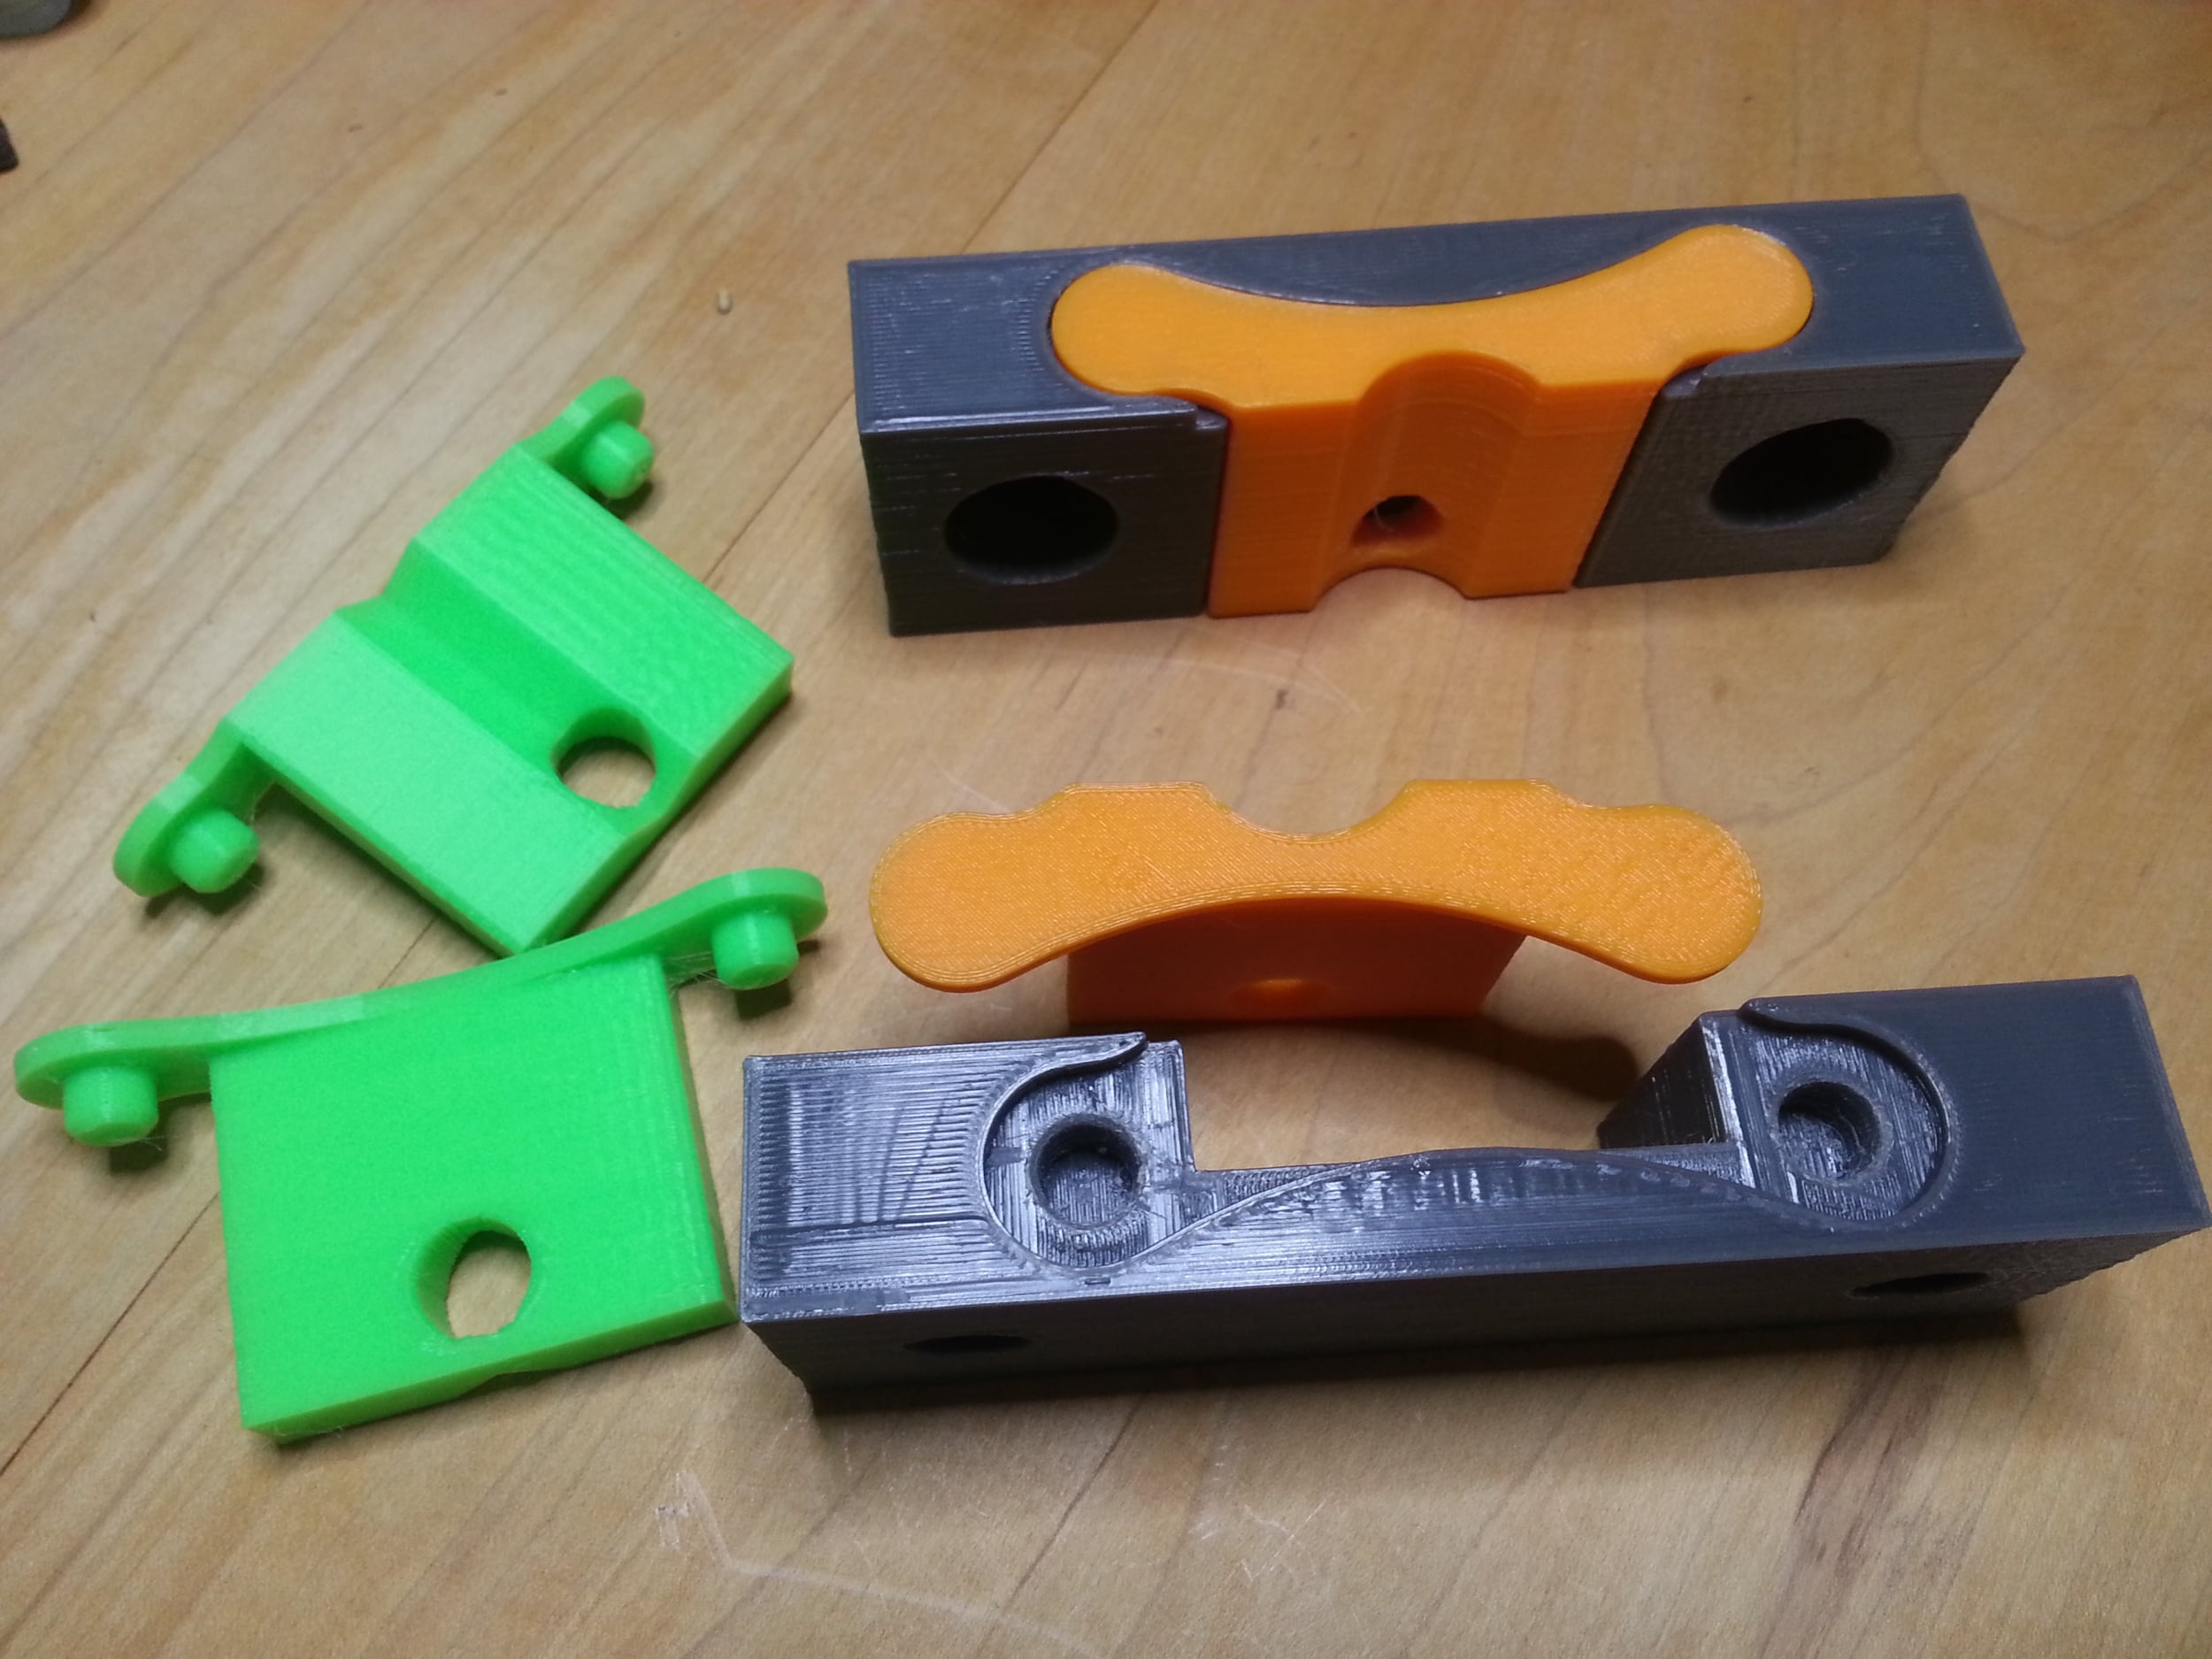
More Innovation: Custom Mill Jaws
We’ve been moving forward with building up another 5 cars for Sector 111 which means we have a lot of parts to make and I’ve been spending lot of time in front of the lathe. After machining parts I’m often left with lot of finished parts that need to have the burrs removed.
In the past we have typically just used a hand drill with a single flute countersink but often it’s difficult to completely remove a burr from steel parts and often if there is a burr on both sides of the part the countersink can catch and spin the part in your hand which is dangerous.
In other instances there are just so many parts its very tedious to do them all by hand. I’ve been using the mill more and more often to remove burrs but the biggest challenge is locating the part consistently in the vice since it doesn’t have a “V” cut into it. V-blocks can help but since they don’t ‘retract’ with the vice they often become annoying.
This past week I decided to make my life easier and design a set of modular jaws that can be bolted into the mill vice. Since very little clamping force is actually required I figured 3D printed jaws should be plenty strong enough to do the job and it has actually allowed me to innovate a bit. Instead of just making a set of jaws with a “V” I made the jaws completely modular allowing for custom inserts to be designed and printed locating any shape or size part. Additionally I can print the insert with a “step” so I will no longer need to use parallels to hold a part high enough in the vice. Now removing burrs is as simple as setting the Z stop, locating the part along X and Y, then just dropping a parts into the vice. Simple and fast!
Weekend Project: Design a 3D Printer

Since getting my first 3D printer and realizing its actually a really fun, useful piece of equipment, I've been thinking of moving into a bigger printer. Comparing different leading printers however, it seems they all have pretty similar build volumes, maybe maxing out around 10 x 10 x 10 with a single extruder (less with a dual extruder setup) and they are all about the same price, about 2000 dollars give or take. Well, I figure I could do a lot with 2000 dollars, and I have a suspicion that the typical pulley systems in use become much less effective as belt size and mass of components increase. Additionally I can see lack of structural rigidity being a factor that will reduce print quality in larger printers since there is a lot of mass moving around at high speed.
So what is my ideal 3D printer? Well, having a build volume in the range of 12 x 12 x 12 would give all the volume you could ever reasonably want. Its rare to print a single object that big, but its pretty common to have print jobs that include multiple small parts which on a large printer can all be done at once. Additionally a large build volume reduces the penalty one pays for having a dual extruder setup which I would like to have. In my design all the drive components are either rack and gear or ACME rod so the stepper motors are always directly driving each axis. I have also looked at reducing friction to the absolute minimum and eliminate any flex or vibration through the use of track and ball bearing carriers for linear motion.
I want the structure of the printer to be as rigid as possible and it seems most things can be pretty easily made out of plate aluminum. The greatest advantage of using plate aluminum is its ease of manufacture. Rather than having complex bent sheet metal or machined components, each plate can be laser cut, then holes can be drilled to size and tapped by hand. Another advantage of laser cutting parts is cost. At Palatov it has been found that getting parts laser cut often ends up cheaper or about the same cost as just buying the plate itself.
Finally, I intend to use as many off the shelf components as possible such as extruders and electronics. Other companies have worked out all the problems in that regard so there is no sense in reinventing the wheel and it will allow for fairly seamless integration with software. It might take some calibration to dial in the distance traveled per step and to tell the software how much build volume is but that's not a big deal.
At this point my design is still at the 'wish list' stage where I find what is easily available from McMaster Carr and other sources and drop it in. Once everything is roughed out i'll go back and refine components and try to reduce the cost. As it stands there is about 1000 dollars worth of precision track and ball bearing carriers in the design alone, ouch! Still if the precision parts cost that much and everything else is 1000 dollars, I'd call it a success seeing as for the same cost I could have bought a different printer with less capability. If it works there is always the potential to offer it as an upgrade kit that people can buy to upgrade the capability of printers they already have.
Some Projects are Just for Fun
I've had my surf board sitting in a corner for quite a while but today I decided to mix things up a bit and hang it on the wall. The easy way to do this would be to go to the store and buy wall brackets. The fun way to do this would be to design my own custom wall brackets then 3D print them! Well if I'm going to 3D print them I might as well make the design somewhat interesting and why not, I'll throw in a couple 'speed holes' too!


More Product Testing
What can you do with a hand full of vortex generators? How about reducing the amount of drag produced by your motorcycle windscreen.


It was pretty easy to custom mold each vortex generator to the curve of the windscreen with a little heat. To adhere them to the windscreen I used some 3M VHB tape. The big question, do they work? Actually, they do!
I might not have access to a wind tunnel but the next best thing to get an idea of how much of an effect just might be observing drops of rain while riding. Before putting the vortex generators on the windscreen rain and spray from the road would collect on the windscreen and eventually run up to the edge then get sucked down into the low pressure area behind it. With the vortex generators in place, the drops of water run up to the top edge like before, but then get sucked up and over my head by one of the vortexes created by a generator. At highway speeds it is also much quieter behind the windscreen which is a plus as well. Overall it has turned out to be a pretty successful experiment.
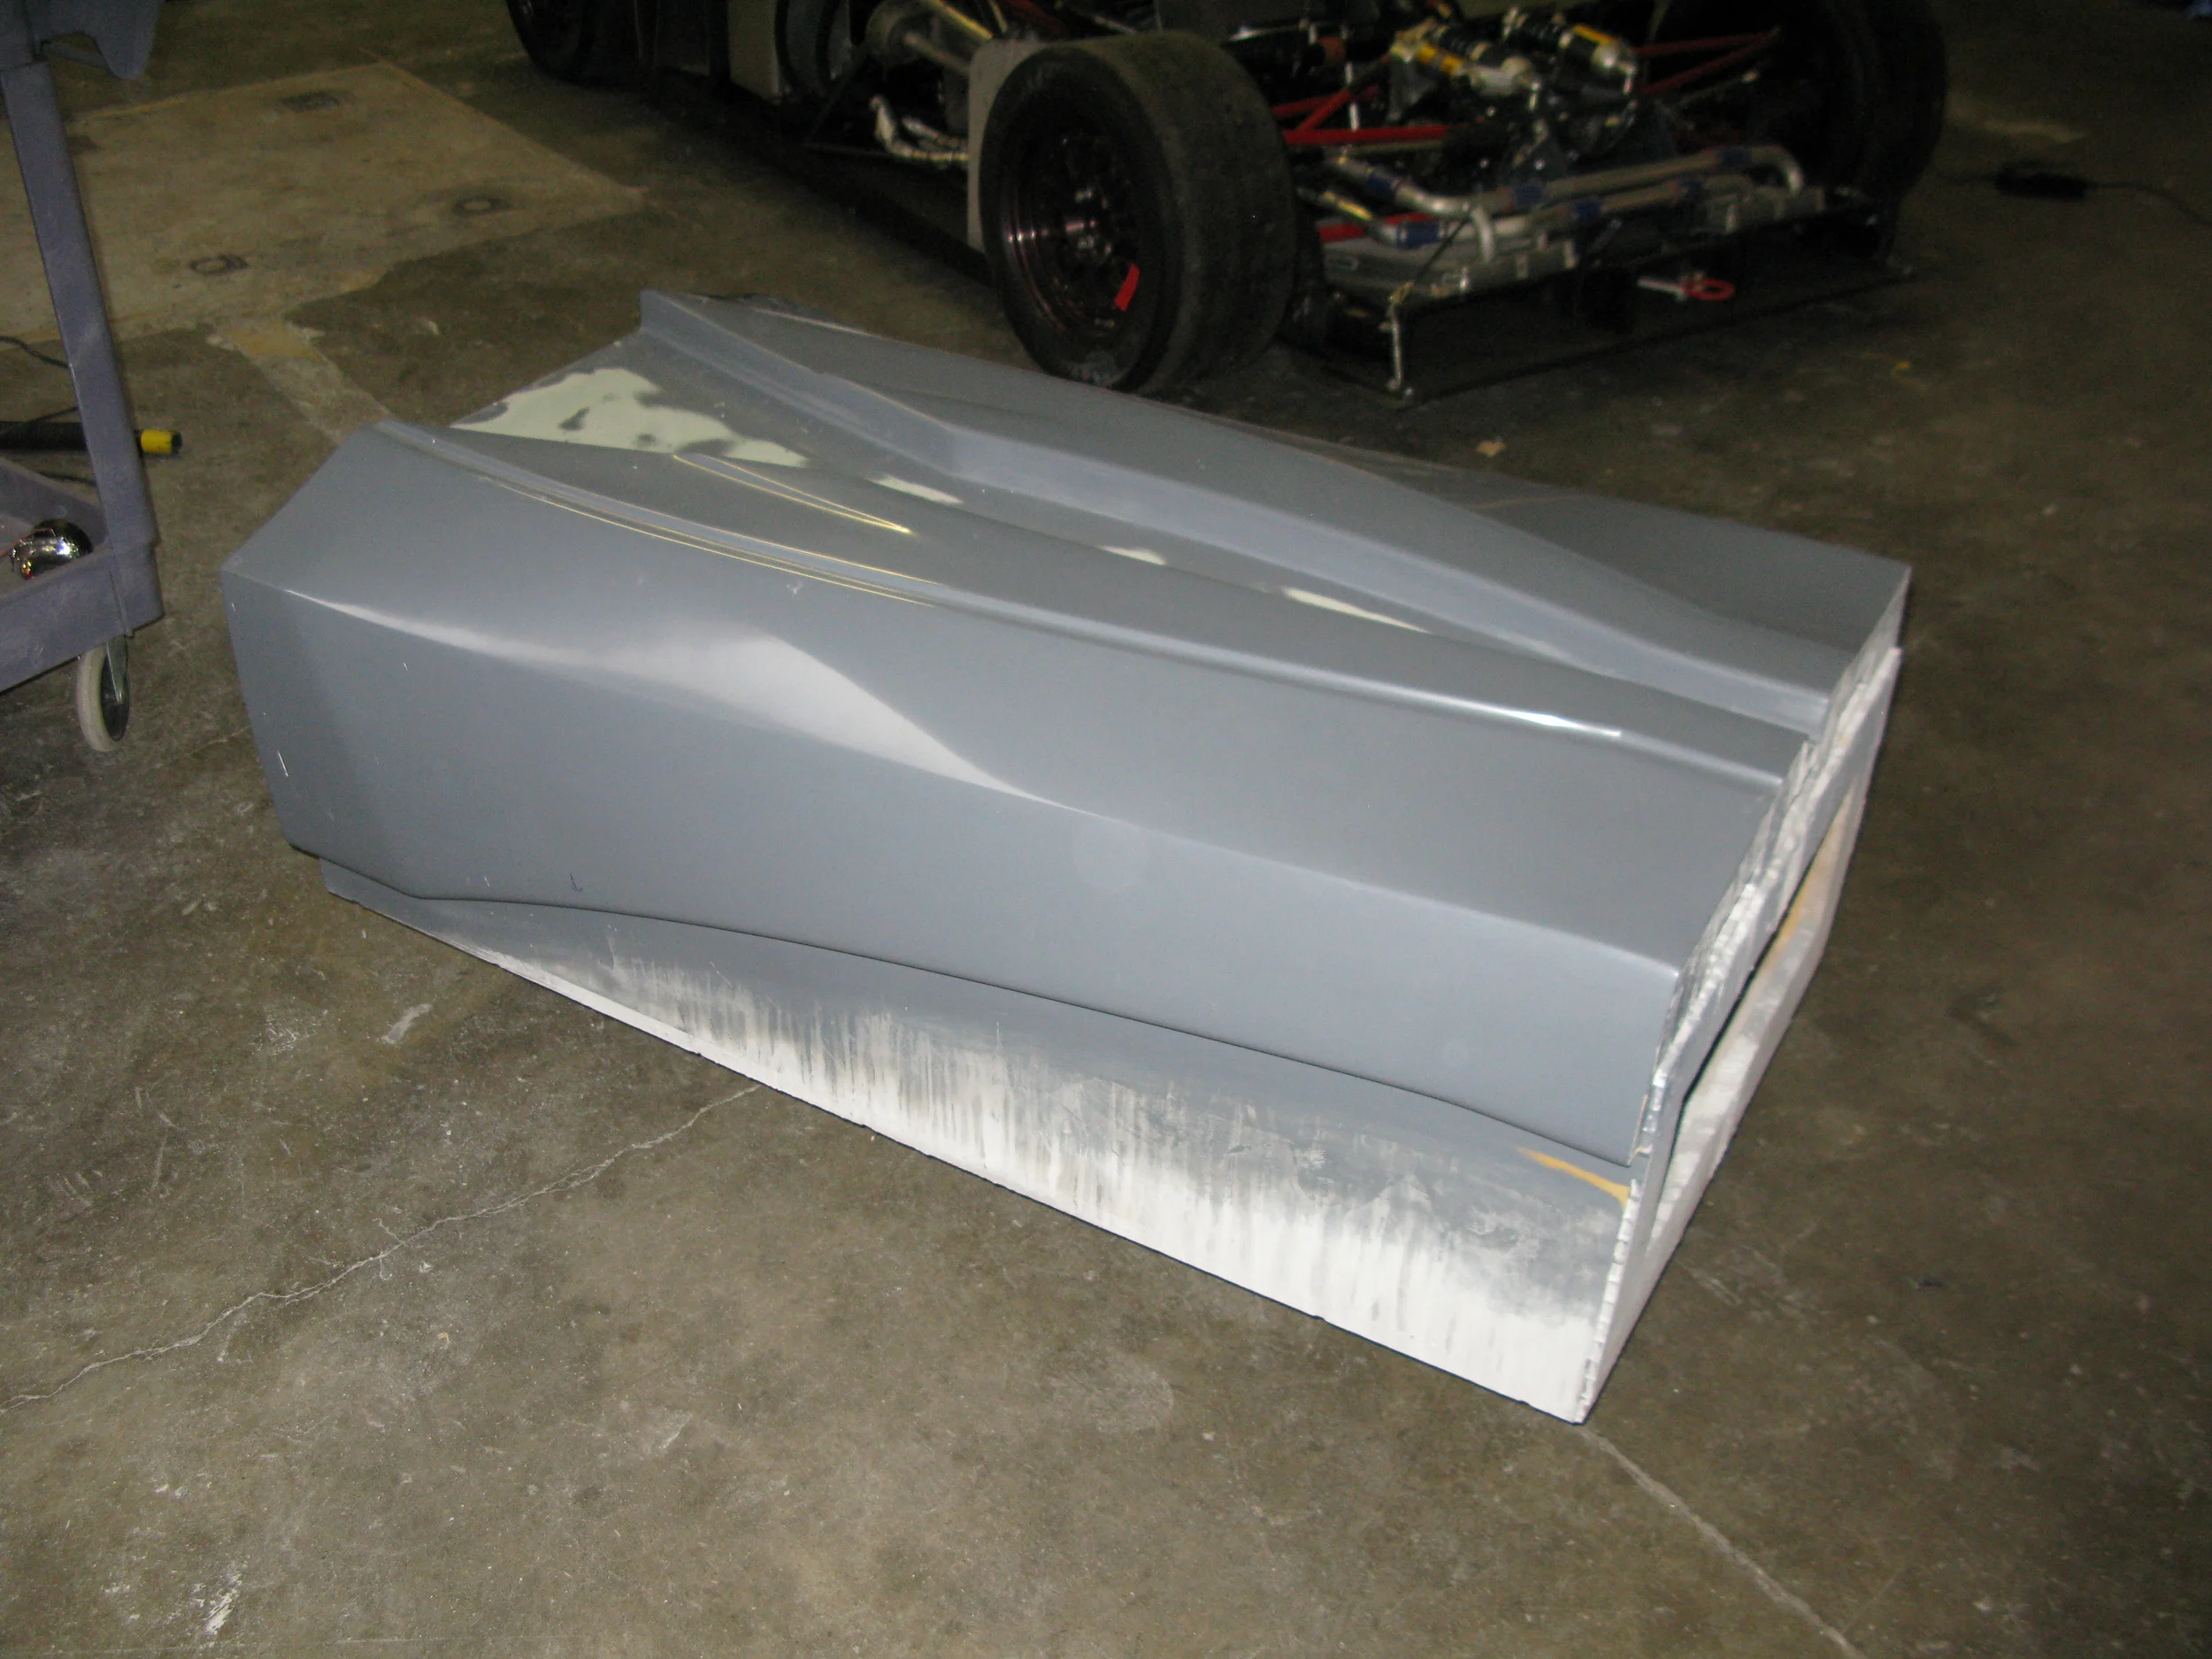
D2 Bodywork Milestone
I managed to wrap up the molds for the new D2 doors this week. Its hard to believe that at one time they were just raw foam! Developing a perfect surface on the parts feels like its almost becomes a sort of obsession. There is sanding to remove large surface defects, then sanding to remove the scratches from the previous sanding, then buffing, lots of buffing. But the end result looks great and its pretty gratifying to have brought the parts to such a stage. It seems theres almost nothing we cant learn to do at Palatov. Up next is going to be the front of the D2 as it is one of the most recognizable parts.


Developing New Skills and Product Testing
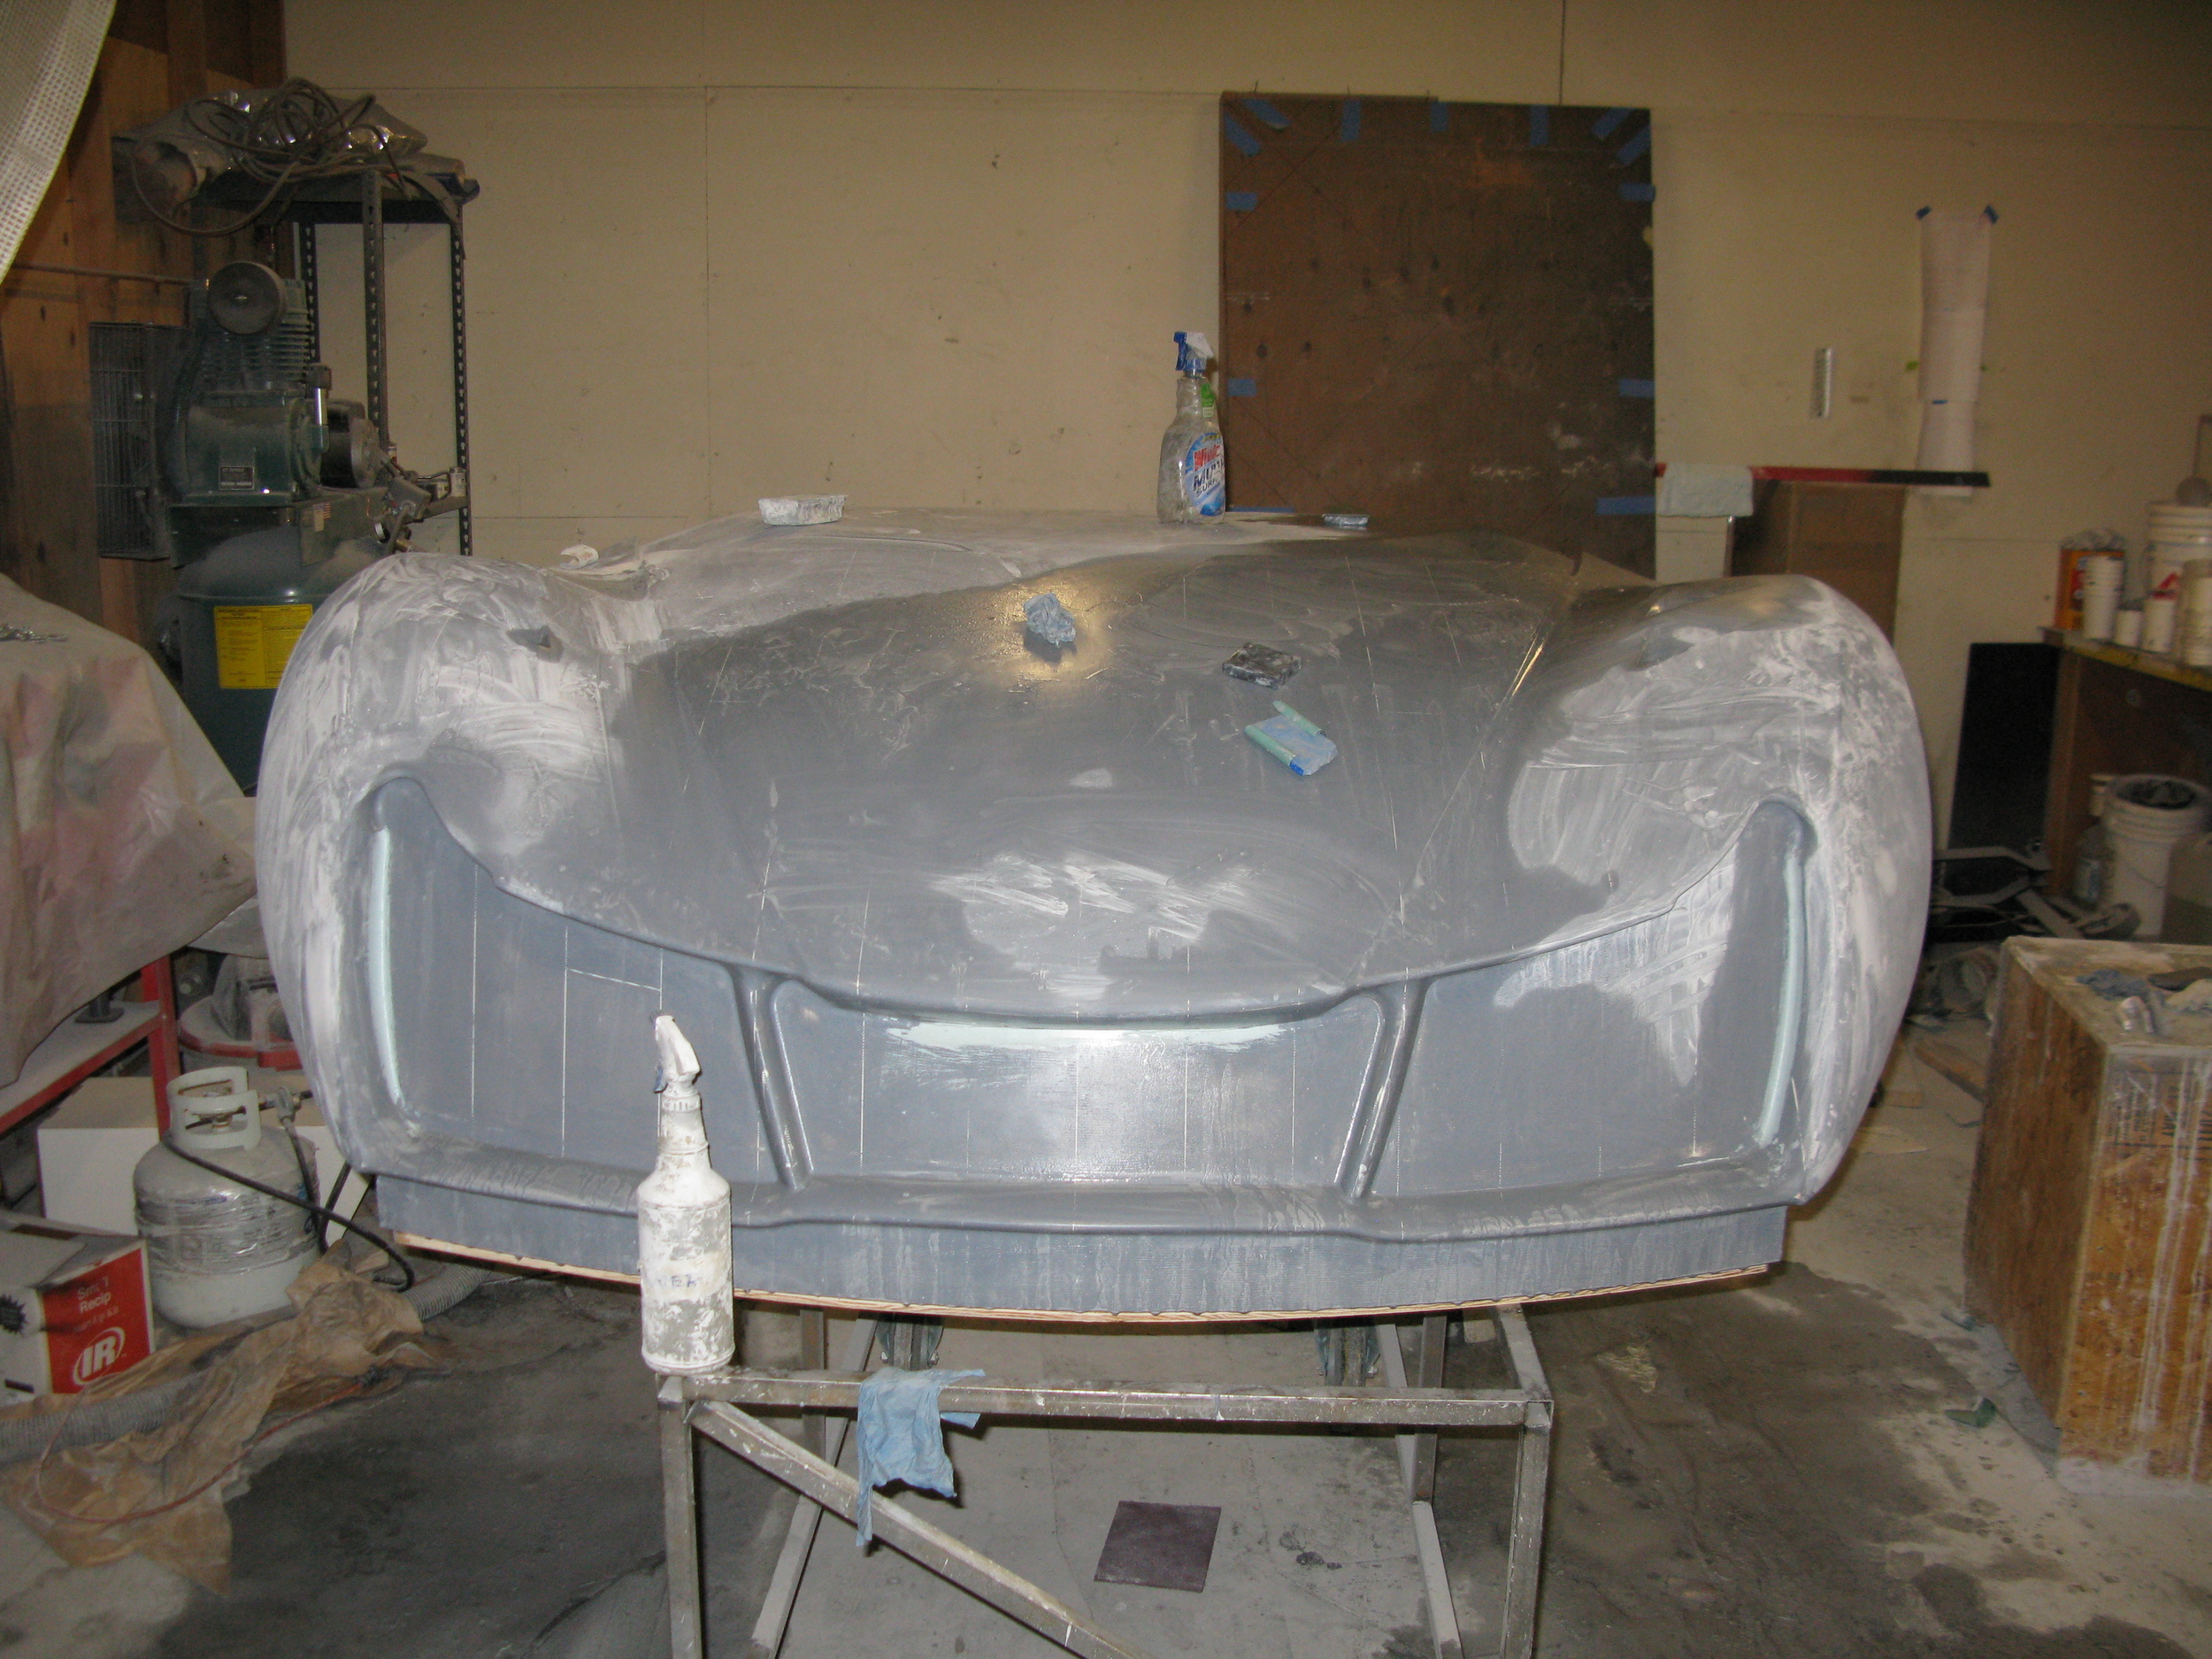
I’ve finished most of the other projects that we’ve had at the shop so now I am focusing primarily on Denk Hot Rod interior panels (pretty much done but on ‘hold’ until we figure more stuff out which will mean redesign or existing parts) and moving the new D2 body work along.
I feel like I am stepping into the past working on the D2 bodywork. It was I believe two years ago now when I helped build the D2 bodywork version 1. That was many months of dusty sanding and Bondo but at least I had some help. This time the shapes have already been defined and created in the computer so I get the task of making them smooth and shiny so fiberglass can be laid over them. I also get to do it all by myself, fun!
Admittedly I was not very enthusiastic about doing this but over the past couple of days I’ve learned a lot and have a method down that seem to work really well. By the end of Friday I had one of the door molds completed but we found out the Duracoat coating was too thin so a complete re-spray was required. A little annoying but at the same time I think I can get the molds back to being shiny in a day or two.


Also I had a chance to test the ability of my vortex generators to conform to surface curvature. I used a pretty extreme example molding a vortex generator around a tube that’s approximately two inches in diameter. Generally any aerodynamic surface is not going to have any curves that extreme but the generator conformed to the curvature perfectly and the actual geometry of the part wasn’t really changed at all. I call that a win!